User Roles and Permission Sets
User Roles and Permission Sets in Artist Growth
Overview
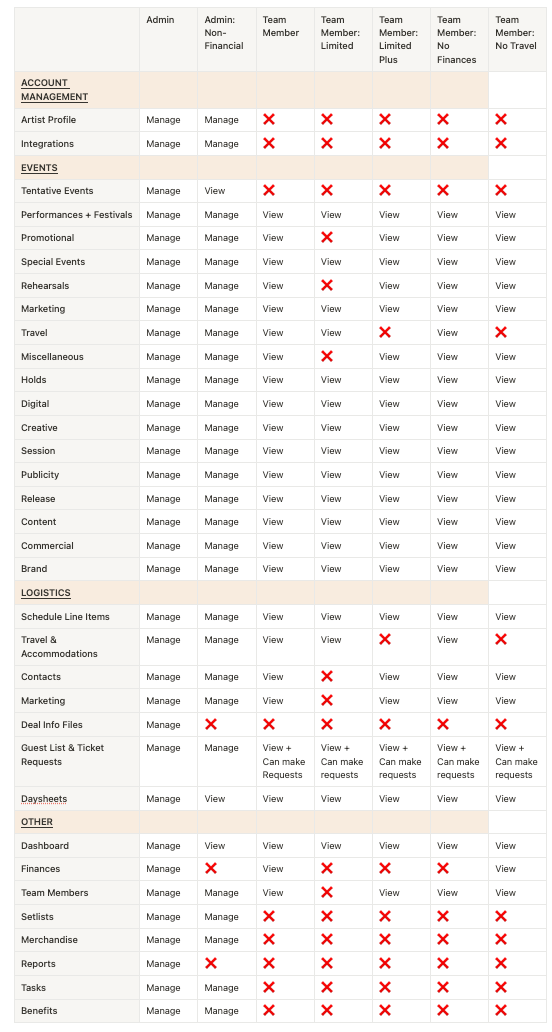
Artist Growth uses roles to define what users can access and edit. Each role comes with a specific set of permissions that can be applied to individual users.
Predefined User Roles
- Admin - Can view and edit all data in Artist Growth.
- Admin: Non-Financial - Can view and edit all data except financial information.
- Team Member - Can view all confirmed events, logistics, day sheets, financial ledger, and team members. Can make ticket requests.
- Team Member: Limited - Can only view confirmed events, schedules, travel, accommodations, and day sheets. Can make ticket requests.
- Team Member: Limited Plus - Cannot view travel events, accommodations, or financial data. Can view all other confirmed events and make guest list requests.
- Team Member: No Finances - Can view all confirmed events and logistics except financial data. Can make ticket requests.
- Team Member: No Travel - Can view all confirmed events except Travel events. Cannot see travel/accommodation data. Can make guest list requests.

Permission Categories
Collaborators - Users with any "manage" permission. These users can create, edit, and delete data. They display a "Collab" label on their profile and may have an orange label showing their organization role.
View-Only - Users with no "manage" permissions. They can only view information and make Guest List requests.
Managing User Roles
Edit Existing Roles
- Click the gear icon (⚙️) next to organization name
- Select "Permissions & Roles"
- Click the three dots beside the role > "Edit"
- Make changes and Save
Delete User Roles
- Click the gear icon (⚙️) next to organization name
- Select "People"
- Click the three dots beside the role > "Delete"
- Confirm deletion
Create a New Role
- Click the gear icon (⚙️) next to organization name
- Select "Permissions and Roles"
- Click "+ Add Role"
- Enter name, select permissions, and Save